create-react-app-buildpack
astro
 Our great sponsors
| create-react-app-buildpack | astro | |
|---|---|---|
| 6 | 10 | |
| 3,328 | 15 | |
| - | - | |
| 1.6 | 9.0 | |
| almost 2 years ago | 7 days ago | |
| Shell | Shell | |
| MIT License | BSD 3-clause "New" or "Revised" License |
Stars - the number of stars that a project has on GitHub. Growth - month over month growth in stars.
Activity is a relative number indicating how actively a project is being developed. Recent commits have higher weight than older ones.
For example, an activity of 9.0 indicates that a project is amongst the top 10% of the most actively developed projects that we are tracking.
create-react-app-buildpack
-
The future of React projects on Heroku
I just started learning React and have been deploying to Heroku since it has worked the best in the past. I saw that the most popular build pack will soon no longer work as Heroku is upgraded. What does this mean for the future of React projects on Heroku?
-
How to Deploy a React App to Heroku in 5 Minutes in 5 Easy Steps
Once you click add buildpack, it displays a pop-up on the dashboard. Paste this link in the Enter Buildpack URL and click on save changes. That is all you have to do.
- Create-React_app with Rails, cannot move from Dev to Production Mode
-
Deploying DApp to heroku: Part (4/4)
https://github.com/mars/create-react-app-buildpack.git
-
Having an insane amount of trouble making a Fullstack React App
the 405 is being thrown by the nginx reverse proxy that's run as part of the community create-react-app buildpack for heroku. I haven't dug in deeply but I'm assuming you're using this and that'd be the place to start. there's some noise about 405s being 'disallowed' for builds using Heroku's static buildpack (which this one does), but I have no idea why, how or if that's actually the case. good luck
-
Hosting React/Rails app on Heroku requires 2 dynos?
I'm not sure you need a dyno for React as it runs in a user's browser. You just need a way to serve the JS to your user. After a quick google search I found this article and this Heroku buildpack. Good luck
astro
-
Astro Comment Form: with Turnstile & Prerender
Name Email Comment Submit
Enter fullscreen mode Exit fullscreen modeYou see the Turnstile code we needed to add is minimal. We add a script tag in the HTML head section (line
7). Then, the little widget which shows up below the submit button (line25).We are using the platform here; we use built-in JavaScript APIs to submit the form. You will see the form has
${siteUrl}/api/messageas the action. That is the route we will set the form handler to listen on.
Turnstile Verification Process
When a user visits the page, the widget runs in the background and decides if the user is a bot or not (traditionally a user challenge would have been used here). The script sends data from the client browser to Cloudflare. Cloudflare then responds with a code. We use that code server-side to check if the visitor passed the Captcha (more on that later). The Turnstile JavaScript code we added will automatically add an extra field with that response code. This is how we get the code from client to server.
Form Styling
Spruce up the form a touch with some extra styles at the bottom of
src/components/CommentForm.svelte:
    button {
        all: unset;
        cursor: pointer;
        background-color: var(--colour-light);
        color: var(--colour-brand);
        padding: var(--spacing-2);
        margin-bottom: var(--spacing-6);
        font-size: var(--font-size-3);
        font-weight: var(--font-weight-bold);
        text-align: center;
    }

    button:focus {
        outline: var(--spacing-px-2) solid var(--colour-alt);
    }

    button:focus,
    button:hover {
        background-color: var(--colour-light-alpha-90);
    }

    textarea {
        resize: none;
    }

    button,
    input,
    textarea {
        border-radius: var(--spacing-1);
    }

    input,
    textarea {
        text-indent: var(--spacing-2);
        line-height: 1.75;
        margin-bottom: var(--spacing-4);
        border-radius: var(--spacing-1);
        border-style: none;
        font-size: var(--font-size-2);
    }

    .cf-turnstile {
        margin-left: auto;
    }
Enter fullscreen mode Exit fullscreen mode🥹 Thank you Page
Before we jump to the form handler, let’s add a thank you page. We will show this on successful form completion. Create
src/pages/thanks.astrowith this content:
--- import Layout from '~layouts/Layout.astro'; export const prerender = true; ---Thanks for submitting your comment!
We will be in touch
body { background-color: var(--colour-theme); color: var(--colour-dark); }Enter fullscreen mode Exit fullscreen mode🍶 Server-Side Form Handler
We are on the home straight now. Once we add the form handler, all we will have left to do is test! In Astro, API routes follow the same file-based routing system as HTML pages. The main difference is that the file extensions are different. Create a
src/pages/apifolder and in there, addmessage.tswith the following content:
import type { APIRoute } from 'astro';

const siteUrl = import.meta.env.PUBLIC_SITE_URL;
const turnstileSecret = import.meta.env.TURNSTILE_SECRETKEY;

export const post: APIRoute = async function post({ redirect, request }) {
    try {
        const form = await request.formData();
        const name = form.get('name');
        const email = form.get('email');
        const comment = form.get('comment');
        const turnstileResponse = form.get('cf-turnstile-response');

        const ip = request.headers.get('CF-Connecting-IP');

        if (typeof turnstileResponse === 'string') {
            const bodyFormData = new FormData();
            bodyFormData.append('secret', turnstileSecret);
            bodyFormData.append('response', turnstileResponse);
            ip && bodyFormData.append('remoteip', ip);
            const response = await fetch('https://challenges.cloudflare.com/turnstile/v0/siteverify', {
                method: 'POST',
                body: bodyFormData,
            });
            const { success } = await response.json();

            console.log({ name, email, comment, success });
        }

        return redirect(`${siteUrl}/thanks`);
    } catch (error: unknown) {
        console.error(`Error in comment form submission: ${error as string}`);
        return redirect(`${siteUrl}/`);
    }
};
Enter fullscreen mode Exit fullscreen modeAgain we are using standard JavaScript APIs for form handling. Remember we said Turnstile adds an extra form field for us? We pull this in in line
12. The final part of the verification process is to send the client response to Cloudflare, along with our secret Turnstile API key. The server replies with a JSON object including asuccessfield. As you might expect this isfalsewhen Turnstile assesses the visitor to be a bot andtrueotherwise.In a real world app, when
successistruewe would want to commit the comment data to our database as well as any other processing needed. We just do a console log here instead. Also in a production app, we should want to do some sanitisation before inserting the data to the database. On top we would have some validation so we do not commit junk to the database. If the comments will be displayed publicly you will also need to filter them checking for inappropriate user-submitted content.Returning to our basic example, finally we respond with a redirect pushing the visitor browser to our new Thank You page (line
30).💯 Astro Comment Form: Testing
Try submitting the form from your dev server. If all goes well, you should see the Thank You page.

To build the site locally we need to run in a Cloudflare wrangler environment. Add an extra script to the project
package.jsonfile to handle this:
{
    "name": "astro-prerender-comment-form",
    "type": "module",
    "version": "0.0.1",
    "private": true,
    "scripts": {
        "dev": "astro dev",
        "start": "astro dev",
        "build": "astro telemetry disable && astro build",
        "preview": "astro preview",
        "preview:cf": "wrangler pages dev ./dist",
    },
    // TRUNCATED...
Enter fullscreen mode Exit fullscreen modeThen run the script from the Terminal:
pnpm preview:cfEnter fullscreen mode Exit fullscreen modeThis time the site will be available at
http://localhost:8788. If this is your first time running wrangler from your machine, follow the instructions in the Terminal to log in.Remember to update
PUBLIC_SITE_URLin your.envfile to match the new URL (otherwise the form will not submit as expected).That’s it! You can now try pushing to Cloudflare Pages. Create a set of Turnstile credentials for you actual public domain first.
🙌🏽 Astro Comment Form: Wrapping Up
In this post, we saw how you can add a server-side form handler to your static Astro site. In particular we saw:
- how to add Turnstile Captcha in Astro,
- how Astro Hybrid rendering and prerendering work,
- some points to consider in a full production comment form.
You can see the full code for this project in the Rodney Lab GitHub repo. I do hope you have found this post useful! I am keen to hear what you are doing with Astro and ideas for future projects. Also let me know about any possible improvements to the content above.
🙏🏽 Astro Comment Form: Feedback
Have you found the post useful? Would you prefer to see posts on another topic instead? Get in touch with ideas for new posts. Also if you like my writing style, get in touch if I can write some posts for your company site on a consultancy basis. Read on to find ways to get in touch, further below. If you want to support posts similar to this one and can spare a few dollars, euros or pounds, please consider supporting me through Buy me a Coffee.
Finally, feel free to share the post on your social media accounts for all your followers who will find it useful. As well as leaving a comment below, you can get in touch via @askRodney on Twitter, @[email protected] on Mastodon and also the #rodney Element Matrix room. Also, see further ways to get in touch with Rodney Lab. I post regularly on Astro as well as SEO. Also subscribe to the newsletter to keep up-to-date with our latest projects.
-
Astro Vanilla-Extract Styling: CSS in TypeScript
You can see the full code for this project in the Rodney Lab GitHub repo. I do hope you have found this post useful! I am keen to hear what you are doing with Astro and ideas for future projects. Also let me know about any possible improvements to the content above.
-
Astro JS Mux Video: using Custom Elements
Take a look at the full project code on the Rodney Lab GitHub page. I hope you found this article useful and am keen to hear how you will the starter on your own projects as well as possible improvements.
-
Temporal API Duration: Working with Time Periods
Open up the Astro project we referenced from the Rodney Lab GitHub repo to play around.
-
Temporal API Time Zones: Convert Times
You can see the code for the demo in the Rodney Lab GitHub repo.
-
Astro JS Sass Styling: SCSS Astro Setup
The Astro JS Sass styling demo code is in the Rodney Lab GitHub repo. You can also try it on Stackblitz.
-
Astro JS Tutorial: Quick Start Astro Guide
Svelte Component { altColours = !altColours; }}>Toggle colours .container { display: flex; flex-direction: column; background: hsl( var(--colour-brand-hue) var(--colour-brand-saturation) var(--colour-brand-luminance) ); align-items: center; width: 100%; padding: var(--spacing-8) var(--spacing-0); color: hsl( var(--colour-dark-text-hue) var(--colour-dark-text-saturation) var(--colour-dark-text-luminance) ); } .container-alt { background: hsl( var(--colour-secondary-hue) var(--colour-secondary-saturation) var(--colour-secondary-luminance) ); color: hsl( var(--colour-light-text-hue) var(--colour-light-text-saturation) var(--colour-light-text-luminance) ); } .button { background: hsl( var(--colour-secondary-hue) var(--colour-secondary-saturation) var(--colour-secondary-luminance) ); } .button-alt { background: hsl( var(--colour-brand-hue) var(--colour-brand-saturation) var(--colour-brand-luminance) ); }
Enter fullscreen mode Exit fullscreen modeFonts
We mentioned that we are using self-hosted fonts above. For the hosting to work,we need to include the fonts in our repo so our host can serve them. Download the Roboto Font in Regular, 400 and 700. Extract the zip and then create a new
fontsfolder in the project’s public folder. Drop the four unzipped files in that folder. The public folder is for anything which we do not need Astro (or Vite, under the hood) to process. As well as fonts, web manifest files for PWA and favicons fall into this category.We won’t optimise fonts here, just to get finished a little quicker. There is a nice video which focusses on self-hosted fonts in Astro together with optimisation. If you are interested in optimisation, do take a look. You can save 80% on some fonts files, especially where, for example you only use the 900 weight font in titles.
🍧 Hosting
The app should be working just fine now, with a nice Roboto sans serif font and all the colours. Try pressing the buttons below the React and Svelte components to check they work. You should notice the background colour change.
The next step is to build the site locally to check it is all working as expected. Run these commands to build and preview the site (stop the dev server with ctrl
+C first):
pnpm run build
pnpm run preview
Enter fullscreen mode Exit fullscreen modeIf all is well, commit the code to a git repo and upload it to your GitHub or GitLab account, so we can host it as a static site. You might notice your site gets built to the
distdirectory in your project. There is no need to include this in your repo as your host will generate the site there for you.It is worth adding a
.nvmrcfile to the project root folder whichever host you are using. This will tell the host know which version of node to use. We will go for the long-term support (LTS) version which is16at the time of writing:
16Enter fullscreen mode Exit fullscreen modeConfiguration
Although we have used
pnpmin this tutorial to build the site, for maximum compatibility, in the cloud usenpm run buildas your build command. We just mentioned that Astro outputs projects to thedistdirectory, so on your host console, set the build output directory or publish directory todist.Here are screenshots for Netlify and Cloudflare Pages which should help you out. Other services will be similar. Select the Astro preset if your host has one, then just check the build command and output / publish directory is
dist.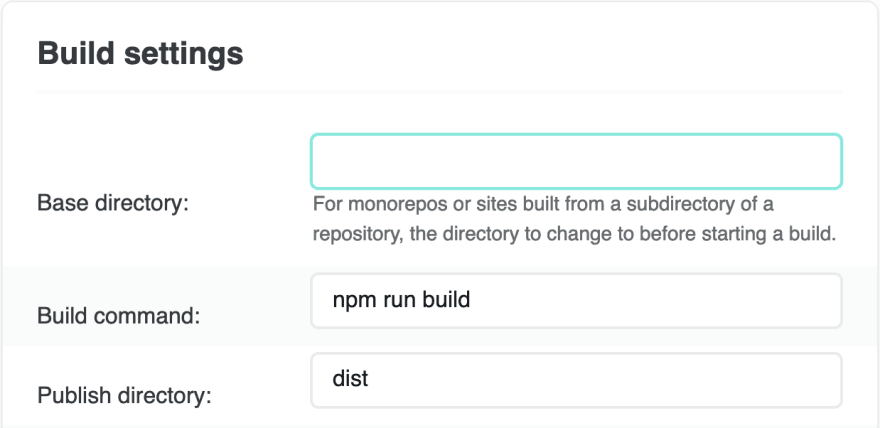

🙌🏽 Astro JS Tutorial: Wrapping Up
In this post we have run through the pipeline for building a static Astro site. We have seen:
- how to spin up a new Astro project with Svelte and React integrations,
- how you can add global CSS styles, local scoped styles and style React components with plain CSS,
- configuration for deploying your static Astro site to the cloud.
The Astro JS tutorial code is in the Rodney Lab GitHub repo. You can also try it on Stackblitz.
I hope you found this article useful and am keen to hear how you will the starter on your own projects as well as possible improvements.
🙏🏽 Astro JS Tutorial: Feedback
Have you found the post useful? Would you prefer to see posts on another topic instead? Get in touch with ideas for new posts. Also if you like my writing style, get in touch if I can write some posts for your company site on a consultancy basis. Read on to find ways to get in touch, further below. If you want to support posts similar to this one and can spare a few dollars, euros or pounds, please consider supporting me through Buy me a Coffee.
Finally, feel free to share the post on your social media accounts for all your followers who will find it useful. As well as leaving a comment below, you can get in touch via @askRodney on Twitter and also askRodney on Telegram. Also, see further ways to get in touch with Rodney Lab. I post regularly on Astro as well as SvelteKit. Also subscribe to the newsletter to keep up-to-date with our latest projects.
-
Astro Landing Page Form: Netlify Serverless Contact Form
The full code for the app is available in the Astro demo repo on Rodney Lab GitHub.
-
Astro Scroll to Anchor: Smooth Scroll to Heading
Before proceeding, download some self-hosted fonts which we will use on the site. Save raleway-latin-400-normal.woff2 and raleway-latin-700-normal.woff2 together with raleway-latin-900-normal.woff2 to a new, public/fonts directory within the project.
- Getting Started with Astro: Build React & Svelte Islands
What are some alternatives?
subdir-heroku-buildpack - Allows to use subdirectory configured via environment variable as a project root
prettier-plugin-astro - Prettier plugin for Astro
Dokku - A docker-powered PaaS that helps you build and manage the lifecycle of applications
remark-rehype - plugin that turns markdown into HTML to support rehype
python-poetry-buildpack - Heroku buildpack that makes it possible to use Poetry with the official Python buildpack
temporal-api-cheatsheet - Temporal API Cheat Sheet: a quick guide to new JavaScript Temporal API including code snippets and example use cases.
heroku-buildpack-python - Heroku's buildpack for Python applications.
heroku-opus - opus codec as a heroku buildpack
mlflow-easyauth - Deploy MLflow with HTTP basic authentication using Docker
heroku-buildpack-google-chrome - Run (headless) Google Chrome on Heroku
heroku-buildpack-phoenix-static - A Heroku buildpack for building Phoenix's static assets
heroku-buildpack-jemalloc - Heroku buildpack that installs the Jemalloc memory allocator