 Our great sponsors
-
- Implement an interface for viewing ReplBot NFTs owned by other users.
- Implement an interface for transferring ReplBot tokens to other addresses.
- Alter the breeding form to show drop-down menus of the user's ReplBots.
- Use the contract event log to track ReplBot creations and births.
- Change the dapp's stylesheet.
- Implement frontend components for any of the new functions you added to the contract after completing part one!
-
SurveyJS
Open-Source JSON Form Builder to Create Dynamic Forms Right in Your App. With SurveyJS form UI libraries, you can build and style forms in a fully-integrated drag & drop form builder, render them in your JS app, and store form submission data in any backend, inc. PHP, ASP.NET Core, and Node.js.

We merge SVGs by appending all of elements in our accessory SVG to the
element in our base ReplBot SVG, and all of the accessory'sandelements to the SVG's main body. This is sufficient for the collection of SVGs we're using for this tutorial, but other SVGs may have additional elements that you'll need to account for.Finally, we'll add the following code that uses
insertAdjacentHTML()to add details about the ReplBot's ID and generation before returning the finalbotSvgin all its glory. Add the following code just below the code above:
        // add ID and generation details
        botSvg.insertAdjacentHTML("beforeend", `ID: ${tokenId}`);
        botSvg.insertAdjacentHTML("beforeend", `Gen: ${details.parentage[0]}`);

        return botSvg;
Enter fullscreen mode Exit fullscreen modeConnecting the UI
We've written all of our app functionality – now we just need to make it usable by binding our HTML interface to our JavaScript functions. Add the following function definition to
App.js, just below the definition ofswitchToReplitTestnet:
    // interface
    bindEvents: function () {
        // mint
        const mintButton = document.getElementById("mint");
        mintButton.addEventListener("click", () => {
            App.mintReplBot();
        });

        // breed
        const breedForm = document.getElementById("breed");
        breedForm.addEventListener("submit", (event) => {
            event.preventDefault();
            App.breedReplBot(breedForm.elements['parentOneId'].value, breedForm.elements['parentTwoId'].value);
        });
    },
Enter fullscreen mode Exit fullscreen modeThis code will trigger
mintReplBot()when the mint button is pressed, andbreedReplBot()when the ReplBot breeding form is submitted. We'll invoke this function ininit, by adding the following:
    init: async function() {

        if (window.ethereum) {
            await window.ethereum.request({ method: 'eth_requestAccounts' });
            window.web3 = new Web3(window.ethereum);

            // Switch networks
            App.switchToReplitTestnet();

            // Interface with contract
            App.replbotContract = new web3.eth.Contract(replbotABI, App.replbotAddress);
        }

        App.bindEvents(); // <-- NEW LINE
    },
Enter fullscreen mode Exit fullscreen modeNext, let's create a function to display our NFT collection. This function will retrieve a list of the current user's NFTs and create an SVG for each of them. Add the following code below the definition of
bindEvents:
    populateCollection: async function() {
        // get bot IDs
        let botIds = await App.getMyReplBotIds();

        // get container
        let botContainer = document.getElementById("bots");
        botContainer.innerHTML = ""; // clear current content

        // create bot SVGs
        botIds.forEach((id) => {
            App.createReplBotSVG(id).then(result => {
                botContainer.appendChild(result);
            });
        });
    },
Enter fullscreen mode Exit fullscreen modeWe'll want to call this function periodically to keep our ReplBot collection up to date. We can use JavaScript's
setIntervalfor this. Add a new line to the definition ofbindEventsas below:
    // interface
    bindEvents: function () {
        // mint
        const mintButton = document.getElementById("mint");
        mintButton.addEventListener("click", () => {
            App.mintReplBot();
        });

        // breed
        const breedForm = document.getElementById("breed");
        breedForm.addEventListener("submit", (event) => {
            event.preventDefault();
            App.breedReplBot(breedForm.elements['parentOneId'].value, breedForm.elements['parentTwoId'].value);
        });

        // show collection
        setInterval(App.populateCollection, 5000); // <-- new line
    },
Enter fullscreen mode Exit fullscreen modeThis will work, but it will recreate all of our SVGs once per second, which will usually be more than we need, and will cause the page to flash constantly. Let's add some caching to prevent this. First, we'll define a new attribute near the top of our
Appdefinition:
App = {
  replbotAddress: "YOUR-CONTRACT-ADDRESS",
  replbotContract: null,
  ownedReplBots: [], // <-- NEW
  ....
}
Enter fullscreen mode Exit fullscreen modeThis attribute will store our list of ReplBot IDs. Every time we call
populateCollection, we'll first check whether the list we get from the contract matches our local list. If it does, we'll skip the rest of the function, otherwise, we'll update the cache and continue. Add the following new code to thepopulateCollectionfunction:
    populateCollection: async function() {
        // get bot IDs
        let botIds = await App.getMyReplBotIds();

        // === NEW CODE BELOW ===
        // check cache
        if (compareArrays(botIds, App.ownedReplBots)) {
            return; // array is unchanged
        }
        else {
            App.ownedReplBots = botIds.slice(); // update cache and continue
        }
        // === NEW CODE ABOVE ===

        // get container
        let botContainer = document.getElementById("bots");
        botContainer.innerHTML = "";

        // create bot SVGs
        botIds.forEach((id) => {
            App.createReplBotSVG(id).then(result => {
                botContainer.appendChild(result);
            });
        });
    },
Enter fullscreen mode Exit fullscreen modeNote the use of
slice()– this will ensure thatownedReplBotscontains a copy ofbotIdsrather than a reference to it.JavaScript does not have a built-in
compareArrays()function, so we'll need to define one. Navigate to the top offrontend/app.jsand add the following code below the definition offetchSvg():
function compareArrays(array1, array2) {
    // arrays must be same length
    if (array1.length !== array2.length) {
        return false
    }

    // arrays must be sorted
    let array1Sorted = array1.slice().sort();
    let array2Sorted = array2.slice().sort();

    // all values must match
    for (let i = 0; i < array1.length; i++) {
        if (array1Sorted[i] !== array2Sorted[i]) {
            return false;
        }
    }

    return true;
}
Enter fullscreen mode Exit fullscreen modeThis function checks that our two arrays are the same length, sorts them and then compares each value. If a single value is different, it returns false, otherwise, it returns true.
Running our application
To run our frontend, we'll create a simple Node.js Express application. Create a file named
frontend.jsat the home directory of your repl and add the following code to it:
const express = require('express');
const app = express();
const PORT = 433;

app.use(express.static('frontend'));

app.listen(PORT, () => console.log(`Server listening on port: ${PORT}`));
Enter fullscreen mode Exit fullscreen modeThis script will serve the files we created in
frontend. To make it execute when we run our repl, make sure that config files are showing and open.replit.In
.replit, replace the linerun = "node tools"with the following:
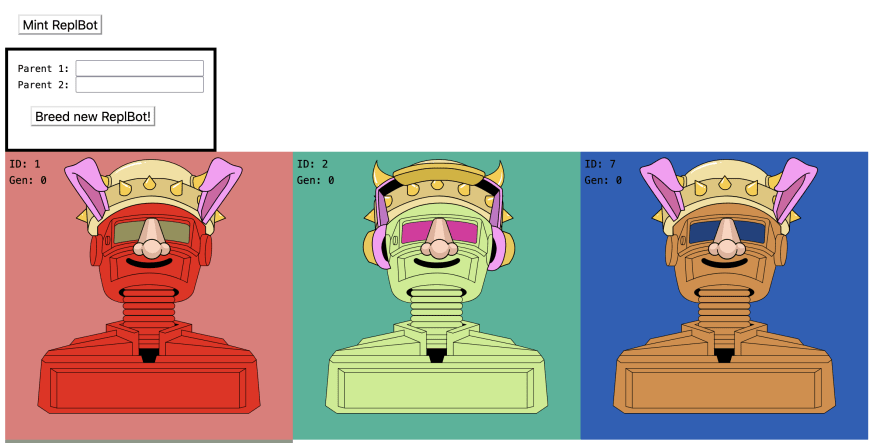
run = "node frontend.js"Enter fullscreen mode Exit fullscreen modeRun your repl. You should now see your frontend. If you've minted any ReplBot NFTs already, those will also show up.
Where next?
In this two-part tutorial, we've built a fully functional decentralised application, but there's a lot more you can do to improve it. Some suggestions:
Your can find our repl here.
Related posts
- Screen Sharing with WebRTC: Harnessing JavaScript for Seamless Streaming
- Express.js: Introduction and Basic Routing
- How to convert exist nodejs/expressjs app from javascript to typescript, the painless way
- ExpressoTS Middleware & Controller
- Express.js repo swamped with spam PRs thanks to YouTube tutorial